Do-It-Yourself
Jump to navigation
Jump to search
General
- At height, always work with a stepladder (as high as possible). Do not use a chair to drill, screw, etc. at height.
- When you're about to disassemble something, make sure you take as many pictures as possible of the mechanism (all sides, aspects, etc). This will be very useful when assembling the system back, as you will forget how it was initially while repairing or fixing.
Stores
Switzerland
- Hornbach sells many sort of screws and wall plugs, and you can pay by the unit, which can be convenient.
- Jumbo has much less choice (for screws and plugs), but they sell boxes, which can be cheaper. Not all stores have the same stock; the Jumbo near Decathlon in Bussigny is better than the Jumbo in Crissier).
Tools
- For an adjustable Wrench, orient the wrench so that the fixed part is first and the sliding part is second. Then to tighten, you need to turn the wheel clockwise and to loosen, counterclockwise.
Welding
- The soldering iron should be a quality model. I initially used a cheap 15W model, but it could not heat enough for serious welding. I replaced it with a 70W Weller 1010 and it was completely different.
- The correct method to weld is to heat the part where you want to weld, then add the other part and the tin wire later. The tin needs to be fully liquid.
- Soldering flux can also be applied (apparently it's useful for more difficult situations with some metals). It will clean the surfaces, eases the tin's adherence to the metal and lower temperature requirements.
Maintenance
- To remove rust from a tool, leave it overnight in a bowl of white vinegar, then scrub with a wire brush / metallic brush. This is very efficient.
- Use mineral oil to prevent rust from appearing. Dry well your tools after usage and coat them in mineral oil.
Fasteners
Screws
- Screws are the most common type of fastening mechanism. They come in many different varieties.
- Some screws can have different types of thread on each end. For instance, this dual-thread stud is a wood screw on one end but has a threaded rod on the other end.
- A threaded rod can be used if you need to fasten something to a place that is high up. For instance, if you need to attach something heavy (like a projector) to a wooden beam that is 50cm higher than the ceiling.
- You would use in this case a dual-thread stud to fasten to the wooden beam, then use a threaded coupling to connect the stud to a threaded rod, then you can attach the equipment (projector) to the bottom of the threaded rod.
- In this case, it can be difficult to screw (as you will have access only to a narrow hole), but there are solutions (tools) for this problem.
- If using a screw directly on a wooden structure such as a wooden beam, it's better not to perform a lot of screw/unscrew cycles, as the wood can get damaged. This will also happen if you drill into the wood (with a standard concrete drill). If you can no longer tighten the screw into the wooden beam, just use a larger / longer screw to fix the issue.
- If the screw head diameter is not large enough (to hold the target object), an easy solution is to add a washer between the screw and the hole. This will have the same effect as if the screw had a larger head.
Rivets
- Rivets are an alternative to screws. However, they have the disadvantage that they are permanent; if you need to untie what you fastened, you will destroy the rivet while removing it.
- You can differentiate between a screw and a rivet if you don't see any imprint in the head. Usually the rivet will just have a hole (circle) in the middle of the head.
- There are various types of rivets, for instance:
- Blind rivets;
- Tubular rivets.
- To remove a rivet, you will need a drill (with a metal drill bit). See this tutorial. If the rivet head does not come off, drill deeper: you may have to drill quite a bit before it gets off and can be removed.
Wall Plugs
- The type of material is extremely important. For plaster, you have to take general material wall plugs. See below for details.
- There are also nylon wall plugs.
Different Types of wall plugs
- Some presentations links: link 1 , link 2.
- For very light weights on plasterboards or paster, universal wall plugs can be used. For heavier weights (but should not exceed 5kg on ceilings), there are two options:
- Toggle bolts (or chevilles papillon in French). Simple to install and probably fine for medium weights. Be careful though, the width of the divider should be small (not more than 13mm). Else the wings of those plugs won't be able to deploy. These are really designed to work with placo (dry walls). Larger dividers (such as gypsum boards) will have a too high width, these bolts won't work with them.
- Molly bolts / metal expansion anchors. Probably better for heavier weights, however you may need a special tool to install those bolts (Molly anchor pliers). Some models can be expanded without pliers, directly by screwing the screw which will expand the anchor. Again here, be careful to choose the model that suits your needs - in particular pay attention to the divider width. Those metal anchors can accommodate much larger widths than the previous plastic ones.
Removing wall plugs
- This can usually be done with a clamp, or by putting a screw inside the plug and pulling on the screw.
- Article for more complex cases.
Adhesive tape & methods not requiring drilling
- Adhesive solutions (such as double sided scotch) are not robust and can support only very light loads. However, for some uses (like adhesive cable clamps) this can work.
- First, use only high quality material (from brands such as Tesa or 3M). Generic chinese brands such as those on Temu are cheap but don't work at all.
- There are three main possible options:
- Tesa Powerstrips: great for light loads, such as cable clamps or light lamps. Those can be reused, so the bound object can be repositioned;
- 3M VHB 5952F Double-sided tape: it's a high quality double-sided tape, and can be used with success for medium loads. However, after usage, the bound object can not be repositioned;
- Soudal Fix All High Tack Glue: I did not have success with this yet, but apparently if correctly done, this glue can fasten light loads to walls. It is a Modified Silane hybrid polymer adhesive.
- It's very important to wear disposable gloves (nitrite gloves) while manipulating the Soudal high tack glue.
- To remove adhesive tape, you can use hairdryer to heat the area first, then remove the tape (with an old credit card if needed). Don't use screwdrivers or aggressive tools, it can damage the painting. To clean up residues, use a mix of 50% warm water (~50 degrees) / 50% white vinegar (domestic one, 10% distilled). Then rub this with a microfiber cloth over the place where the tape was glued to.
Drilling holes
- It can be quite difficult to mark the exact spots where drilling should be done. I've bought tools to help with this (laser meter, laser level). This should be better than with a manual measuring tape (in addition, the measuring tape damages the paint).
- If done with a pencil, be careful to have an eraser as well, as you will probably make a lot of marks. Pencil is actually not ideal as the marks are hard to remove on the walls / ceiling. I'd like to try with stickers.
- If drilling several holes to attach a binding (metal piece for instance), it's better to drill the minimal number of holes, partially attach the binding, and then drill the remaining holes through the attachment. This is because it can be quite hard to drill the hole exactly at the correct level without any guidance (even if you marked the target point precisely with a pencil).
- Using a hammer and nail can be useful to mark the target drill point. This will create a small anfractuosity that will help with the start of the drilling.
Finding structural elements
- Unfortunately, a stud detector (for wooden beams) does not work very well. However, there are various techniques available, but the base principle is to explore as much as you can from the viewpoints you have access to. For instance, you can look what's on the roof by opening windows, you can explore an attic, etc.
- One smart technique is to use powerful magnets to localize precisely on a lower floor an element you've located on a upper floor. For instance, the position of a wooden joist found on the attic floor can be mapped on the ceiling of the bedroom of the lower level via two powerful magnets. Be careful to take them powerful enough, but not too much to risk not being able to separate them!
- Another technique is to just drill holes (on the ceiling for instance). Then you can check what you drilled into, and use an endoscope camera to explore. If you drill the holes in an area that will get covered up later, they won't be visible so you get a lot of freedom.
- Once you drill and if you feel that there is no vacuum, the stud is probably present. Even if you see no wooden bits in the drill bit, this can be normal (especially if the wooden structure is just after a plaster layer). As long as you sense that the drilling feeling is not the same, and that the hole is sufficiently deep to be past the plaster layer, you're probably already in the wooden part.
Electricity
Safety & Checking Electric Current
- Be careful to always check (with a voltage tester) if there is live current on a wire before performing an operation on it (or near it). Even if it's after a switch or something that seems to act as a switch. There is a high risk of electrocution if you don't do that, be really careful about testing, and don't think that "there is no live current there so it should be OK".
- Note that if you are not sure, checking with a phase tester (screwdriver) may not be enough as the neutral wire may be not connected. In this case, there is still a phase on the phase wire, but electric current still does not pass. In that case, the proper tool to use is a multimeter.
Toggle Switches
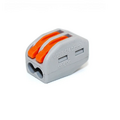
- For a 3 position toggle switch, normally only 3 pins are required (one input to carry the phase, and two outputs to carry the phase to the motor various inputs). I bought a 4 pin one, you can just ignore / not use the second input pin and it works correctly. Note that the neutral and protective earth wires should be connected separately from the switch.
- I also bought a double (twin) toggle switch which just contains two independent toggle switches. For AC current, the live wire should be duplicated (easy with a three port electrical connector) to both entry pins. Then the two load wires should be connected to the device(s) and to the load pins of the switch. The neutral wire should be connected directly to the motor / device, bypassing the switch. In my case, there were 3 pins per circuit (so a total of 6 pins), so one pin in each circuit was not used (it would probably be used only for DC current). It was important to connect the live wire and load wire to the correct pins, else the switch would not work. On the following picture, the live wire was connected to the left silver pin (marked as +) and the load wire (from the device) to the middle silver pin. The golden pin was not used at all.

Dry contacts
- Dry contacts don't have a potential difference between the two terminals. You can see them as a simple switch that is open or closed. They are usually part of an electric component / equipment (such as a contactor), and in this case the dry contact is not wired to the other part of the electrical circuit. This means you can just connect a live wire to a terminal, a second wire to the other terminal, and current will flow if the other electrical circuit activates it. Note that you can use a current with a different voltage than the one powering the equipment.
- For instance, a contactor can have a dry contact. With some contactors, you can build the equivalent of a logical AND - the current would flow only if it flows into the contactor main circuit and to the dry contact.
Capacitors
- If you don't have a multimeter with built-in capacity measurement, you can check if a capacitor is working with the classic resistance mode. Check this link, second method.
- To ensure a proper measure, make sure you discharge the capacitor fully first (by connecting the two electrodes). Also you may need to choose a high limit (2M Ohms was needed in my case). If the measure goes quickly over the limit, the capacitor is not working correctly: numbers should take several seconds and increase steadily if the capacitor is functional.
Electric connectors
- Spade connectors, that can be used to wire electric circuits, must be crimped with a proper tool (don't use tape). Crimp at the middle section of the spade connector.

- Electric dominos are being replaced by electric connectors that don't require screwing.
-
 Electric domino
 -
 Electric connector


Electrical adapters
- What is important is that the voltage between the adapter and the device matches. Then the power of the transformer can be higher, it is not a problem (this corresponds to a higher amperage). If the power is lower (lower amperage) the device is not at risk, it is the transformer that will heat up and wear out (it will often blow quickly).
- Note: the power corresponds to the product of the voltage and the intensity. Example: 12v x 3A = 36 Watts.
Sockets and Plugs
- For laptop power adapters, connectors can be of the C5 type, while connectors to desktop PCs are usually C13. These are the female connectors, the corresponding male ones are C6 / C14. See this page for details.
- Switzerland T12 / C5 cables are available.
Wires
- The thickness of an electrical wire follows several standards. In Europe, it is usually measured in "cross-sectional area" in mm2. In the United States, they use the AWG standard (American Wire Gauge). Be careful: the lower the number on the AWG standard, the thicker the cable is.
- For safety considerations, you should use 2.5mm2 cables (for 16A circuit breakers, which corresponds to standard electric appliances like personal computers) / 13-14 AWG. For 10A circuit breakers (usually for lights / low power devices), you can use 1.5mm2 / 15-16 AWG cables. Thinner cables are potentially dangerous, and should be avoided (at least, they are not compliant with European / Swiss norms).
Cable Tearing Prevention
- To prevent cable tearing, several options are available.
- One is to use cable glands; this is not a very compact solution however. For a PG11 cable gland (enough to hold 2.5mm2 wires), the cable gland piece mesures 30mm in length and I was unable to find more compact versions. With smaller PG numbers though, the pieces get smaller.
- Another is to use a cable clamp, directly after a closing plate for instance. This is just held by two screws and is a much more compact solution (although probably less safe than a cable gland).
Lighting
Technical Information
- Bulb power (incandescent scale):
- 40 W -> very low.
- 70 W -> low.
- 500 W -> very good.
- Lumens:
- More than 12 000 lumens: good for large areas that need to be very luminous (gaming rooms, kitchen).
- 8 000 to 12 000 lumens: large areas that need to be well lit (dining rooms, living rooms).
- Technology:
- LED: best type available currently (2024). Low consumption.
- Halogen: best power, high consumption, heat.
- Compact fluorescent: good consumption, OK power, unfortunately there is a lighting time for high power. Obsolete.
- Incandescent: worst consumption. Obsolete.
Available bulbs and characteristics
- In 2025, smart dimmable bulbs (E27 base) can go up to ~2500 lumens (RGB LED), or 150W equivalence. It's rare though - I only found a model from the WiZ brand that claims to do 2452 lumens (26 CHF). It supports Matter but only via WiFi / Bluetooth, not Zigbee.
- Other brands usually go only up to 1600 lumens. For instance, Philips Hue has a E27 bulb with 1600 lumens, but extremely expensive (~80 euros for a single bulb). Ledvance has ~1500 lumens models (RGB, smart dimmable) for around 8 EUR if bought in pack.
- Cheap Chinese models (around 5 EUR) can be 18W but it's actually 9W for white + 3W x 3 for RGB. I did not test them yet, so not sure if they are bright enough.
- To go beyond 2000-2500 lumens, there are only corn bulbs available, even if you require white color only. Corn bulbs are very bright but cannot generally be used in standard living environments, as they are painful for the eyes. I did not try dimmable corn bulb models (only dimmable via physical dimmer, they are not smart dimmable bulbs).
- 2000-2500 lumens are also available in white dimmable models (via dimmer, not smart dimmable), for instance there's a Ledvance 2452 lumens model, E27, 20W. However, this model only exists in warm white color (2700K), not 3000K or more which can be an issue.
Installation
- Before installing a light on the ceiling, make sure to clean it thoroughly. During the installation, dirt traces can easily appear on the white (painted) ceiling. Even though this can be mostly removed with a magic sponge, better to prepare the equipment so that it is as clean as possible to minimize dirt traces.
Small LEDs in devices
- If you want to remove a LED in a device (you don't like the visual signal it gives), the easiest may be to just cover the LED in a opaque black paint. I did that with an Essie Licorice nail polish, the results are very good. This particular paint is very opaque/black and blocks most of the LED's light.
Shutters
- For Somfy motors (and probably others), when checking if the motor works correctly (after changing a capacitor for instance), make sure it is fully installed in the axis AND the panel is attached to it. Don't test outside the axis, or without the panel. It seems there are several security or detection mechanisms to prevent the wheel from turning in some cases (while no weight is detected, probably). In particular, it's totally normal that the wheel at the end of the motor only turns manually in one direction when the motor is considered independently. It will work correctly once fully assembled and attached to the panel.
- The mechanism that prevents the wheel from turning (which in turn prevents the shutter from falling) is a thermal brake (I've seen it being called electrobrake as well). You can't act on it (ie, you cannot disable it), it should be left alone.
- While fixing a Somfy motor, if possible don't touch the starred wheel at the end of one side of the motor. The screwing mechanism seems complex, and once I destroyed it inadvertently. I screwed it back with only the screw, which seems to work, but it's not the correct original mechanism.
- Adjusting the end stops on a Somfy shutter is important, but depends on the particular model. It usually involves manipulations with particular command sequences. Refer to the manual corresponding exactly to the Somfy model.
- Configuring the end stops is not needed if the last blade has a stop (for the upper end limit), or if the first blade has a rigid lock (for the lower end limit). A blade directly screwed to the axis counts as a rigid attachment, so in this case setting the lower end stop is optional.
Troubleshooting
- If the motor refuses to activate on one direction but seems to be functional (ie, the other direction works well, the capacitor works correctly, the motor makes some noises), double check if something prevents the blades from moving inside the rails. I've had one occurrence when after changing a capacitor and reinstalling everything, the shutter would not go down (but would come up). Resetting everything would also not work (the shutter would not move back and forth as it should have). This was apparently due to mechanical issues preventing the blades from moving down on the rails. Fixing this allowed the shutter to go down again when the proper switch was activated. So double check for any obstacles, and try to remove them.
Plumbing & Bathrooms
- Angle valves (such as this one) can be controlled with the screw under the end cap.
- For sink drains (bondes de lavabo in French), there is usually two joints, one on the top part (in the sink) and one on the bottom part (under the sink). It can be a bit confusing because while the bottom one is usually in plastic, the material for the top one is similar to polystyrene (not elastic). The top part should still be installed by pressing hard into this joint.
Joints
- TPFL joints should always be done in the screwing direction. This video is very useful to understand the logic; if it's not done in the correct direction, the TPFL headband can be removed.
- Another easy reminder is that the TPFL ribbon needs to be enrolled on the male part, with a clockwise direction if you're looking directly at the male part (ie if you can see the insertable part first). Another video explaining the direction.
- Two more videos in English: https://www.youtube.com/watch?v=f7mjyzfB9Ec and https://www.youtube.com/watch?v=EkuLHpYz02Y.
Washbasin cabinet installation
- Always check if the drawer from the cabinet will not be blocked by the sink drain and/or the siphon. The height of the drain (when you add the siphon) can prevent the drawer from being able to go all the way. It's important to check this before you start cutting the siphon.
Applying silicon paste / Replacing silicon seals
General remarks
- You need to apply a silicon paste to create joints between the basin and the walls/cabinet. This also acts as a glue.
- Expect normal silicone seals to last around 8 years before they start to be corrupted by mold. You will recognize mold when the seal starts to get black dots and then becomes fully black over time. You can remove the first dots with an anti mold product (like the HG Anti-Mold Liquid Spray) but over time, you need to replace the joints fully.
- The main factor to lengthen the lifespan of your joints is ventilation / humidity of the bathroom. With a poor ventilation and a high level of humidity, seals will only last two years. It's a painful operation to change silicone seals, so better to make them last as long as possible.
- There are several colors available (mainly white and transparent). Some brands (like Rubson or Sika) also provide anti mold silicon - it's very important to choose such products for the bathroom as mold will eventually come in.
- Otto is apparently a premium brand (see for instance https://www.otto-chemie.com/en/construction/ottoseal-s-100). Seals like the Ottoseal S100 can apparently last more than the standard 8 years (10-15). The good thing is that they have a lot of available colors in their anti mold range (that contains superior fungicide products).
- It's important to choose a correct color, especially when replacing the seals. This is because removing existing seals will probably damage a bit (scratches, black marks) the area around the hole. If you choose a transparent silicone, these won't be hidden. With the right color, those damaged parts will be covered and thus invisible.
Removing silicon seals
- This is a difficult, long and painful process, but with the right tools and method it will be much easier.
- First, spray an anti mold product over the joints. If they are already black, this will not change the color much but should destroy the mold spores and allow you to operate safely.
- Then remove the seals of the top / vertical areas. The reason is that a lot of debris will fall into the bottom holes if you start removing the bottom joints. So better to process from top to bottom.
- Note that you need to entirely remove the whole silicone joint. You cannot remove only part of it even if for instance the upper part seems sane. This is because you cannot create a junction between the new and old silicone seals; the seal adheres to dry, smooth surfaces but will glide over existing silicone.
- The first step is to cut the silicone on both sides, either with a cutter or special blade or with the Einhell Varrito tool. The choice of the tool is very important - I used a kit from Temu but it was extremely tedious and time consuming.
- Some tools I bought for this part: RS PRO Stripping knife, Olfa 18mm L5 Cutter, Rubson Double-ended joint remover.
- Normally, you should apply a special silicone removal product (like the Molto Anti-silicone cleaner) with an old brush over the joint first. This will soften the silicone and should make it easier to remove. I have not had much success with the Molto product and will try another one next time (Rubson for instance).
- If you use the Varrito tool, be careful that it can very easily damage / create black scratches in the areas near the sealant. Never use it perpendicular to the ceramic tiles, always use with an angle. It's also better to use it only if you have a colored seal to hide underneath imperfections. You may also try to put some masking tape near the seals before using Varrito: this may prevent scratches (I did not try this technique yet).
- Next, you need to scrape the remaining silicone (once the largest part has been cut with the cutter and removed). This part is the hardest and again the choice of tools is crucial here. Normally with a good set of tools, it should and also minimize the risks of damage to the surrounding areas.
- Some tools I bought for this part: Swiss Tools Seal scraper, King Tony 9CJ7416 Tungsten Carbide Blade Scraper, Stanley - Metal Scraper, KS Tools Stainless Steel Scraper, Presch 4 pieces Wood Chisels Set.
- After all the silicone has been removed, spray the anti mold product over the black parts underneath the seals and rub with a toothbrush. This will not remove the black color entirely (it may have a partial effect), but will ensure there's no mold present anymore.
- Then reapply the silicone removal product, this time to remove the remaining silicone parts. Wait 5-10 minutes, then clean everything with a microfiber cloth and 70% isopropyl alcohol.
- Wait for several hours (ideally, one night) before applying the new seals. The surfaces should be completely dry and clean.
Applying silicon paste
- Warning: this is a difficult process, even harder than the removal process. Some practice is needed before you'll be able to make beautiful, visually pleasing seals.
- When preparing the silicone cartridge, it is better to open it exactly when you will apply the paste. Else it will dry and you will need to remove it from the nozzle. If you want to reuse some previously opened cartridge, it is better to use two nozzles (see this video). In any case, don't cut the nozzle.
- First, make sure you have enough silicone cartridges. You need at least a backup one, because if you use up all your silicone and the seals are not finished, you're in trouble. It's important to apply all the seals at the same time. Also make sure you have enough masking tapes (you will need a lot, especially if you replacing joins on the shower cabin or bathtub).
- Prepare the areas: cover all the sides of the joints with the masking tape. Don't start until all the masking tape is in place (that way you will also know if you have enough masking tape). The width of the masking tape should be between 3 and 5 cm. Probably 4 is ideal, but 3 is fine. Be careful to use a normal one, not a low adhesive one as those are a pain to setup.
- The width of a joint should be small: 5mm to 1cm maximum. For this reason, paste the masking tape near the interstice (3-4mm away). If the interstice is large, you should normally not use a joint to fill it.
- To apply the paste, it's much better to use an electric cartridge gun rather than a simple manual one. This makes the job easier because it applies the silicone very regularly. I use a Einhell Cordless Sealing Gun TE-SG 18/10 which works well.
- Make sure you use disposable Nitrile gloves (as getting silicone all over your hands is messy), and that you also have paper towels nearby. It will help a lot to wipe excess silicone or clean up tools.
- To apply the silicone, use the lowest speed of the sealing gun and try apply regularly. It's important not to stop at a corner if possible, and to apply over the whole length of the joints. Don't use a lot of silicone - it's tempting but will create a mess later. And never reapply a second time the sealing gun over an area where you already put silicone.
- Immediately after the silicone has been installed in the gap, use a joint smoothing tool to remove the excess silicon. Do a single pass - if you start making several passes, it will easily become a mess. The key here is to not use too much silicone and cleanly use the smoothing tool once. Some useful links: first, second, last.
- Very important: remove the masking tape before the joint dries, else removing the tape will create a mess and pull the silicone away (it will stretch, like a chewing gum). You have 3 minutes, maximum 5 minutes to do this after the silicone is out of the cartridge. So it's important to be quick and efficient.
- Wait 24 hours / 48 hours for the silicone to dry. After it's totally dry, you can use cutting or scraping tools to remove the silicone that does not look nice visually. Then clean up with 70% isopropyl alcohol and a microfiber cloth.
Assembling furniture
- While the furniture is not completely assembled, perform the assembly on the center of the piece, to be as far as possible from the walls as possible. Else, chances are high that during the assembly the parts can damage the wall paint. Also, use cardboard under the furniture to prevent parquet damage.
- When dealing with pneumatic cylinders (vérin in French), it can be perfectly normal that you are not able to manually move it. The added force from a lever arm is a lot, especially if the length of the arm is important (like in a bed frame, around 1.5m). Just install the cylinder where it should be, and it should move once all the pieces are in place.
- For heavy furniture, put quality furniture pads underneath it (to prevent parquet scratches) while assembling the furniture, not after. It's much more difficult to put them once the furniture is ready.
- If you forgot the pads, then use a jack to add the pads later. You should use a microfiber cloth (several layers, so fold it several times) between the jack and the wooden panel, else the MDF board will get damaged.
- Check every side of the furniture to find the proper place to apply the jack (the place where you can insert it). Once the jack is inserted and you can lift the furniture, use a wooden board as a wedge to hold the furniture into place while you add the pad. You should then leave the wedge, lift on another area with the jack and also put a wedge underneath. Process like this until all pads were added.